Create a Simple Tracker Form
Create one custom profile form and two program stage forms inside src/extensions/. Reuse the core's tracker registration, enrollment, labels, inputs, rules, and save actions.
What you will make for this guide
| Part | Fields |
|---|---|
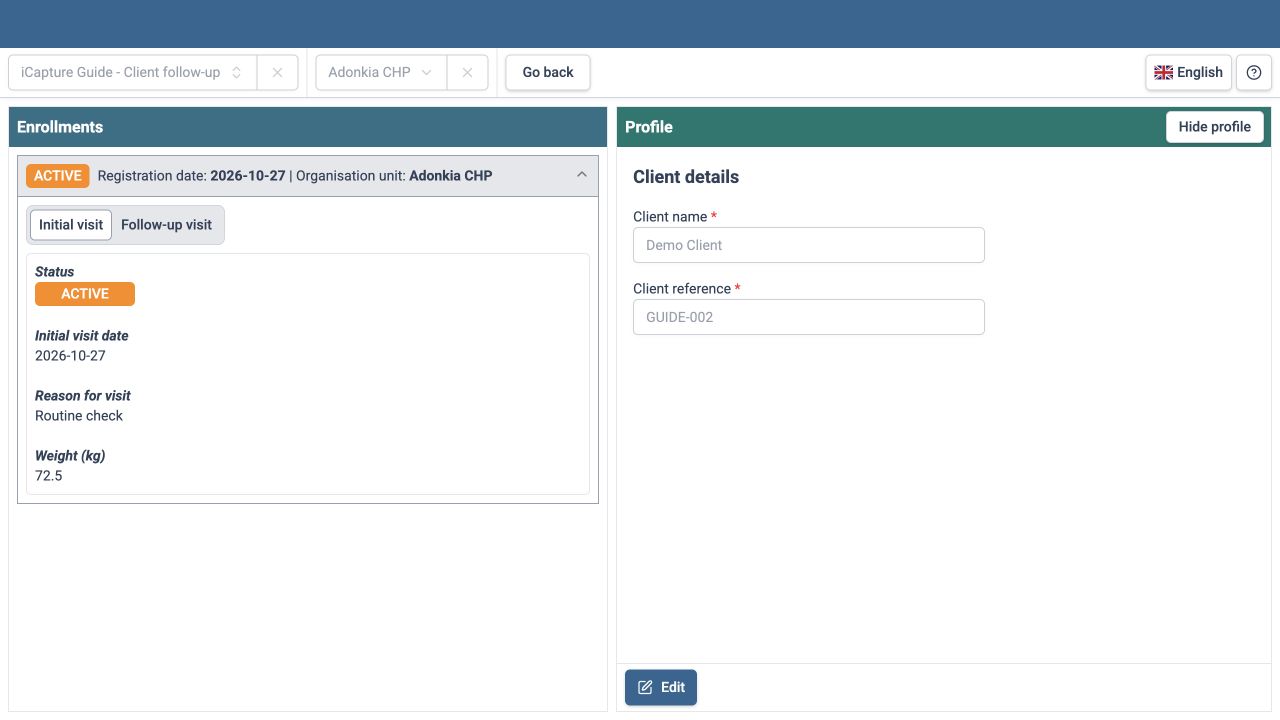
| Client profile | Client name and Client reference, both required text attributes |
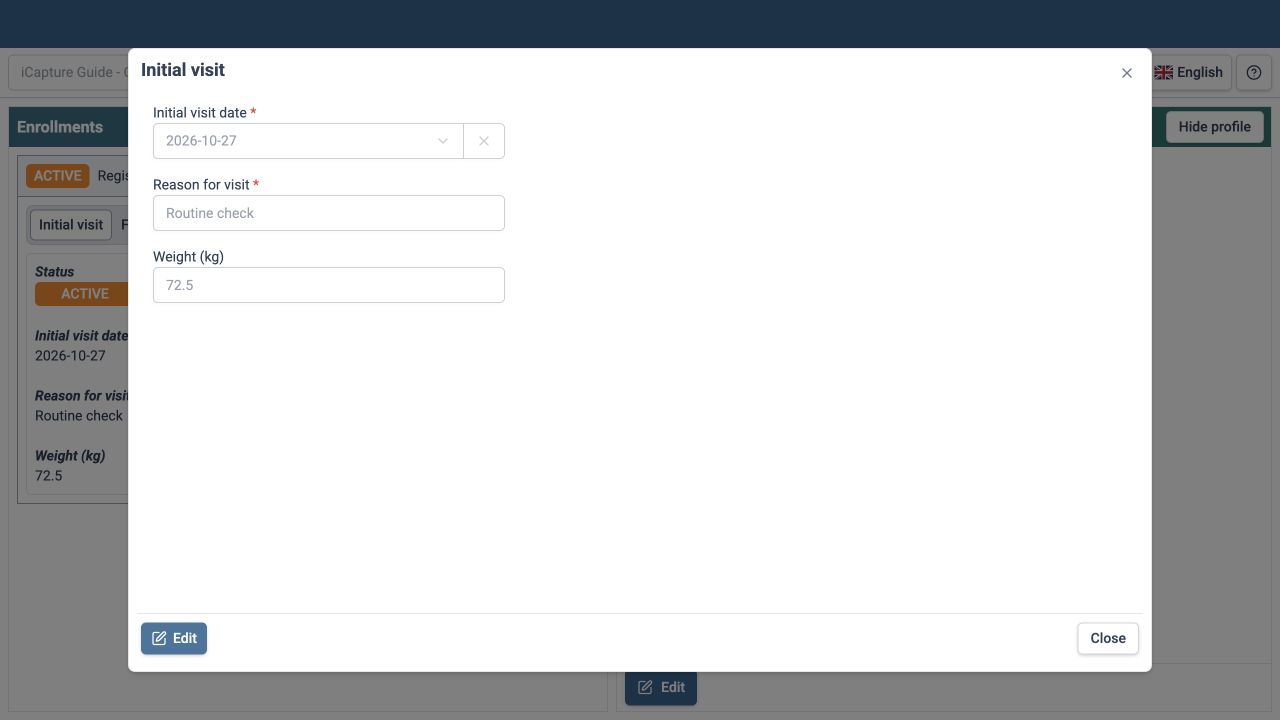
| Initial visit stage | Initial visit date; required Reason for visit; optional Weight (kg) |
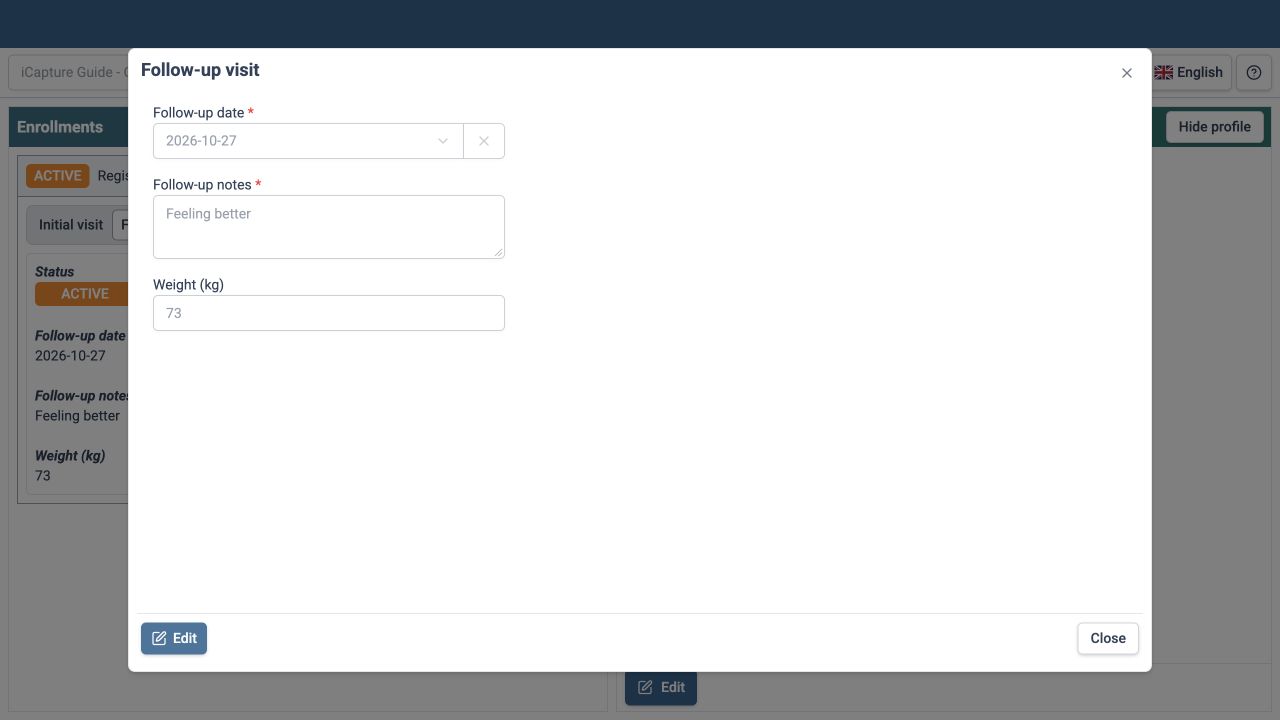
| Follow-up visit stage | Follow-up date; required Follow-up notes; optional Weight (kg) |
The same profile component is used during registration and in the client dashboard. One shared stage component is registered for both stage identifiers and reads the current stage's own fields. Each stage therefore shows different fields without duplicating the layout code.
The layouts use a narrow vertical list with p-4 max-w-sm space-y-4. There are no screen-size variants or custom stylesheets.
Before you start
Complete Start Locally and Extension Basics. Use Core Reference to look up the shared stores, inputs, labels, and form props.
This guide uses the official Sierra Leone demo running DHIS2 in dhis2.org. Choose an available stable instance from the demo instance selection page, then configure the chosen base URL as described in the aggregate guide.
Use fictional client details. The public demo resets nightly, so keep the metadata package to restore the example.
1. Prepare the DHIS2 metadata
Download the tracker metadata package. Validate and import it through DHIS2 Import/Export. The package contains nine objects: one tracked entity type, two tracked entity attributes, three data elements, one tracker program, and two program stages.
| Object | Identifier | Configuration |
|---|---|---|
| iCapture Guide - Client follow-up | jbZi5ACSm33 |
Tracker program with registration; assigned to Adonkia CHP |
| iCapture Guide - Client | oY2Ed0GvkHO |
Tracked entity type |
| Client name | deIlWuSSI6Y |
TEXT; mandatory program attribute |
| Client reference | ZcpXHg6J7MK |
TEXT; mandatory program attribute; not unique in this example |
| Initial visit | dzjsTgo7lFm |
Non-repeatable stage, created manually |
| Follow-up visit | gcPZTlLE6F5 |
Non-repeatable stage, created manually |
| Reason for visit | V7y7u4L3gbj |
TEXT; compulsory in Initial visit |
| Follow-up notes | iODtYTcA4kb |
LONG_TEXT; compulsory in Follow-up visit |
| Weight (kg) | UnVkWXJQi6r |
NUMBER; optional in both stages |
The package uses the demo's existing Adonkia CHP organisation unit (Rp268JB6Ne4) and default category combination. It does not replace shared demo objects. On another database, prepare equivalent metadata and update the program and stage identifiers in config.js.
Understand what each part stores
- The tracked entity stores Client name and Client reference as attributes.
- The enrollment connects that client to the tracker program and records the registration date.
- Each stage event stores its own visit date and data values within that enrollment.
Weight uses the same data element in both stages. Its values remain separate because they belong to different stage events.
If you create the metadata manually
- Create a Client tracked entity type and two text attributes. Give the attributes the form names shown above.
- Create a tracker program with registration, assign the type, and add both attributes as mandatory program attributes displayed in the client list.
- Set the enrollment date label to Registration date and leave incident-date entry disabled for this example.
- Create Initial visit and Follow-up visit as non-repeatable stages, with automatic event creation disabled.
- Add each stage's required text field and the optional Weight (kg) field. Use the tracker/event data domain for all three data elements.
- Set the stage event-date labels to Initial visit date and Follow-up date.
- Assign the program to Adonkia CHP. Keep default categories and no sections, geometry, or option sets.
Allow public data capture
Check Sharing on the program, both stages, and the tracked entity type. Set public metadata access to Can view only and data access to Can capture data. The package includes these settings. Attributes and data element definitions are publicly viewable.
The tracked entity type also needs data access: metadata viewing alone can cause E1006 when the tracker list requests client records. Check its data sharing if the server says the user is not authorized to read the program's tracked entity type.
Public sharing applies to signed-in users; appropriate authorities, organisation unit assignments, and category option access are still required.
Checkpoint: reload iCapture, select iCapture Guide - Client follow-up and Adonkia CHP, and confirm the core tracker list and registration action are available.
2. Create the extension files
Keep the existing aggregate and event extensions and add:
src/extensions/
├── tracker/
│   ├── config.js
│   ├── profile-form.jsx
│   └── stage-form.jsx
└── useExtensions.jsx
src/extensions/tracker/config.js
Configure the program and two stage identifiers. Attribute and data element identifiers are read from core metadata, so there is no local field list.
export const TRACKER_PROGRAM_ID = "jbZi5ACSm33";
export const INITIAL_VISIT_STAGE_ID = "dzjsTgo7lFm";
export const FOLLOW_UP_STAGE_ID = "gcPZTlLE6F5";
3. Create the profile form
src/extensions/tracker/profile-form.jsx
Read the selected program's attributes and reuse the core attribute label and input components:
import RhfDhis2Input from "@/components/dhis2/rhfdhis2input";
import AttributeLabel from "@/features/tracker/attributelabel";
import useSelectionStore from "@/store/selectionStore";

const TrackerProfileForm = ({ status = {}, editing, loading }) => {
  const { program } = useSelectionStore();

  return (
    <div className="p-4 max-w-sm space-y-4">
      <h2 className="text-lg font-semibold">Client details</h2>
      {program.programTrackedEntityAttributes.map(({ trackedEntityAttribute }) => {
        const fieldStatus = status[trackedEntityAttribute.id] || {};
        if (fieldStatus.hidden) return null;

        return (
          <div key={trackedEntityAttribute.id}>
            <AttributeLabel attribute={trackedEntityAttribute.id} />
            <RhfDhis2Input
              dataItemId={trackedEntityAttribute.id}
              disabled={!editing || loading || fieldStatus.disabled}
              helpers={fieldStatus.helpers}
            />
          </div>
        );
      })}
    </div>
  );
};

export default TrackerProfileForm;
How the profile form works
useSelectionStore()supplies the selectedprogram.program.programTrackedEntityAttributesdetermines which attributes to display.AttributeLabelreads the attribute metadata and displays its translated form name and mandatory marker.RhfDhis2Inputuses the attribute identifier asdataItemIdand connects to the existing form context.statussupplies hidden, disabled, and helper-message states.editingandloadingpreserve the core's read-only and busy states. Inputs are disabled when the profile is not being edited, while saving, or when a core rule disables the field.
The core already displays the registration date during registration, before this custom component. Do not duplicate enrolledAt or create a new enrollment date input in the profile component. The same component later appears in the dashboard and becomes editable through the core Edit action.
The profile component needs no form provider, save handler, or API request.
4. Create the shared stage form
src/extensions/tracker/stage-form.jsx
The core passes the active programStage into the component. Use that prop, so each stage shows its own fields. Do not select program.programStages[0] here: this form is used for both stages.
import RhfDhis2Input from "@/components/dhis2/rhfdhis2input";
import DataElementLabel from "@/features/tracker/dataelementlabel";
import EventDateLabel from "@/features/tracker/eventdatelabel";

const TrackerStageForm = ({ programStage, status = {}, editing, loading }) => {
  const dateStatus = status.occurredAt || {};

  return (
    <div className="p-4 max-w-sm space-y-4">
      {!dateStatus.hidden && (
        <div>
          <EventDateLabel programStage={programStage} />
          <RhfDhis2Input
            dataItemId="occurredAt"
            dataItem={{ valueType: "DATE" }}
            disabled={!editing || loading || dateStatus.disabled}
            helpers={dateStatus.helpers}
          />
        </div>
      )}
      {programStage.programStageDataElements.map(({ dataElement }) => {
        const fieldStatus = status[dataElement.id] || {};
        if (fieldStatus.hidden) return null;

        return (
          <div key={dataElement.id}>
            <DataElementLabel dataElement={dataElement.id} programStage={programStage.id} />
            <RhfDhis2Input
              dataItemId={dataElement.id}
              disabled={!editing || loading || fieldStatus.disabled}
              helpers={fieldStatus.helpers}
            />
          </div>
        );
      })}
    </div>
  );
};

export default TrackerStageForm;
How the stage form works
| Reused item | Purpose |
|---|---|
programStage |
The stage for the event currently being opened. |
programStage.programStageDataElements |
Supplies that stage's data element references. |
Tracker EventDateLabel |
Displays the stage's event date label and required marker. |
Tracker DataElementLabel |
Displays the translated form name and compulsory marker for a stage field. |
RhfDhis2Input |
Connects the date and stage values to the core form context. |
status |
Supplies field states and messages from core rules and validation. |
editing, loading |
Keep inputs read-only until editing is enabled and disable them while saving. |
status.occurredAt is the event-date field's state, not its date value. The || {} fallback allows the component to read its properties when no state entry is available yet.
Profile fields use tracked entity attribute identifiers. Stage fields use data element identifiers. The event date uses the special core field name occurredAt with explicit DATE metadata.
Use the label imports from @/features/tracker/ in this tracker component. The event-program guide uses separate labels from @/features/event/.
5. Register the profile and both stages
src/extensions/useExtensions.jsx
Keep the aggregate and event registrations and add the three tracker entries. The complete hook for this project is:
import { useEffect } from "react";
import useExtensionStore from "@/store/extensionStore";
import MonthlyServiceTotals from "./aggregate/monthly-service-totals";
import { DATA_SET_ID } from "./aggregate/config";

import SimpleEventForm from "./event/simple-event-form";
import { EVENT_PROGRAM_ID } from "./event/config";

import TrackerProfileForm from "./tracker/profile-form";
import TrackerStageForm from "./tracker/stage-form";
import { TRACKER_PROGRAM_ID, INITIAL_VISIT_STAGE_ID, FOLLOW_UP_STAGE_ID } from "./tracker/config";

const useExtensions = () => {
  const setExtensions = useExtensionStore((state) => state.setExtensions);

  useEffect(() => {
    setExtensions(["aggregate", "forms", DATA_SET_ID], MonthlyServiceTotals);
    setExtensions(["event", "forms", EVENT_PROGRAM_ID], {
      Form: SimpleEventForm,
      validations: {},
      rules: []
    });
    setExtensions(["tracker", "programConfig", TRACKER_PROGRAM_ID, "profileForm"], TrackerProfileForm);
    setExtensions(["tracker", "programConfig", TRACKER_PROGRAM_ID, INITIAL_VISIT_STAGE_ID], TrackerStageForm);
    setExtensions(["tracker", "programConfig", TRACKER_PROGRAM_ID, FOLLOW_UP_STAGE_ID], TrackerStageForm);
  }, [setExtensions]);
};

export default useExtensions;
| Registration entry | Component |
|---|---|
tracker.programConfig[TRACKER_PROGRAM_ID].profileForm |
TrackerProfileForm |
tracker.programConfig[TRACKER_PROGRAM_ID][INITIAL_VISIT_STAGE_ID] |
TrackerStageForm |
tracker.programConfig[TRACKER_PROGRAM_ID][FOLLOW_UP_STAGE_ID] |
TrackerStageForm |
Each entry is updated separately so other project configuration remains available. The two stage entries point to the same component; the core passes the appropriate stage metadata each time.
Core mandatory rules and existing DHIS2 program rules remain in use. No custom rules or save implementation are required for this example.
Checkpoint: reload iCapture and open registration. Confirm the core Registration date field appears, followed by the custom Client details form.
6. Register and edit a client
- Select the tracker program and Adonkia CHP, then use the core registration action.
- Choose a Registration date.
- Enter
Demo Clientfor Client name andGUIDE-001for Client reference. - Select the core Save action. Confirm the client dashboard opens with an enrollment in the program.
- Confirm the custom profile is initially read-only.
- Select Edit in the profile, change Client reference to
GUIDE-002, and save. - Reopen the same client and confirm the attributes were restored.
7. Enter the Initial visit
- In the client's enrollment, select Initial visit and use the core action to add its event.
- If the event opens in read-only mode, select Edit.
- Choose an Initial visit date, enter
Routine checkfor Reason for visit, and enter72.5for Weight (kg). - Select the core Save action and reopen the same stage event.
- Confirm its date and values are restored.
8. Enter the Follow-up visit
- Within the same client and enrollment, select Follow-up visit and add its event.
- Select Edit if needed and choose a Follow-up date.
- Enter
Feeling betterfor Follow-up notes and73for Weight (kg). - Save and reopen the event. Confirm these values are restored.
- Reopen Initial visit and confirm its weight remains
72.5. The follow-up event should not overwrite the initial event's values.
Profile and stage inputs update their existing form state. Use the core Save actions to persist a profile or event; they do not use the aggregate input's automatic save-on-blur behaviour.
9. Check validation and record identity
- Try registration without a required profile attribute and confirm core feedback blocks saving.
- Try a stage event without its required text field or event date and confirm the core feedback.
- Confirm optional Weight (kg) can be left empty.
- Confirm the profile and stage fields are read-only outside Edit mode.
- Edit an existing event, save it, and confirm the same event identifier is retained.
- Confirm one client has one enrollment and one event in each of the two non-repeatable stages.
This first example uses only text attributes and basic text and number stage fields. Additional field types, sections, geometry, option filtering, and specialised constraints need their corresponding core props or components.
Example files
- Tracker metadata.
- Program and stage configuration.
- Profile component.
- Shared stage component.
- Combined registration hook.
Completion checklist
- [ ] The custom profile is used for registration and the dashboard.
- [ ] The core supplies the registration date and save actions.
- [ ] Attributes and stage fields come from the selected metadata.
- [ ] Both program stages use the shared stage component.
- [ ] Hidden, disabled, validation, read-only, and loading states are preserved.
- [ ] Profile edits and both stage events persist after reopening.
- [ ] Stage values remain associated with the correct events and enrollment.
- [ ] No duplicate client, enrollment, or events are created during editing.
- [ ] Application code changes are limited to
src/extensions/.
Continue with Testing and Troubleshooting before submitting your project change.