Create a Simple Event Form
Create a custom event form inside src/extensions/ using iCapture's selected program, shared labels, shared inputs, validation, and Save action.
What you will make for this guide
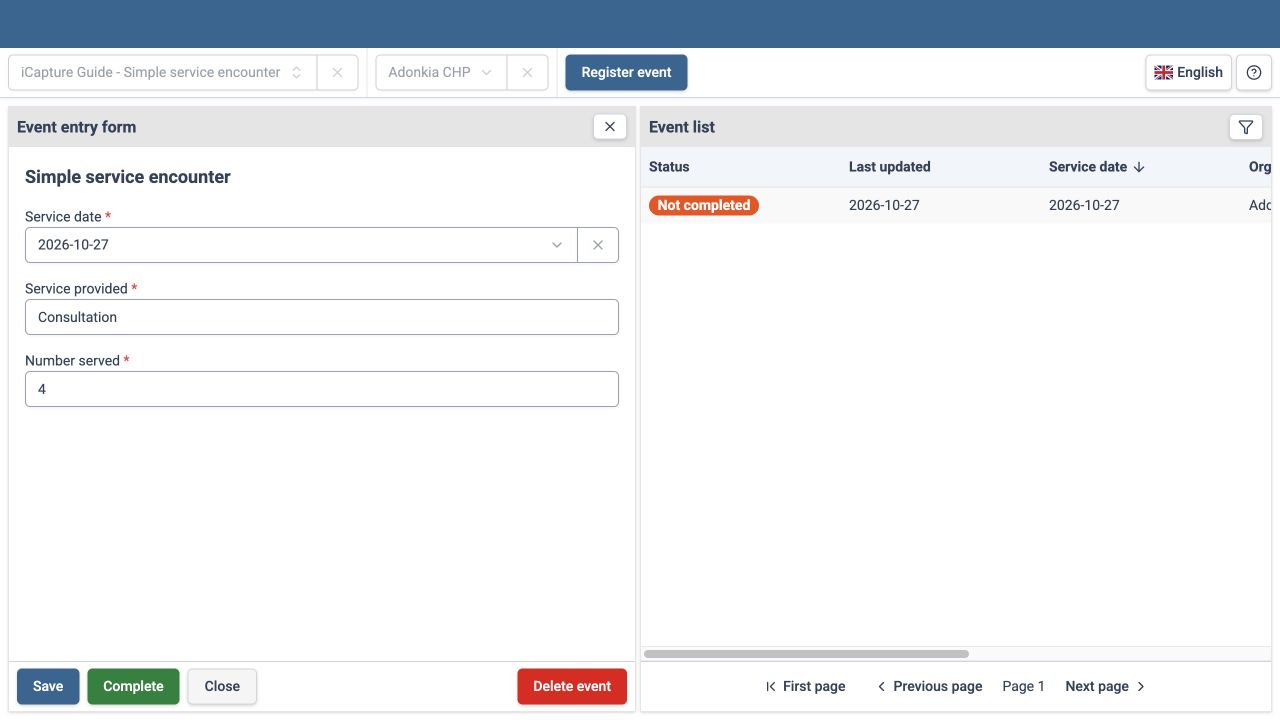
A simple service encounter form with three inputs:
- Service date — required date of the encounter.
- Service provided — required text.
- Number served — required non-negative whole number.
The component reads the data fields from the selected program's first stage. You do not maintain a separate list of field identifiers or labels in your extension. The layout uses a plain vertical list with minimal Tailwind classes and no screen-size variants.
Unlike the aggregate input, RhfDhis2Input updates the existing form values without saving the event immediately. Use the core Save action to save the whole event.
Before you start
Complete Start Locally and Extension Basics. Keep Core Reference available for short explanations of the reusable components and variables.
This guide uses the official Sierra Leone demo running DHIS2 in dhis2.org. Open the demo instance selection page, choose an available stable instance with the Sierra Leone database, and configure its base URL as described in the aggregate guide.
Use fictional values. The public demo resets nightly; keep the metadata package so you can restore the example.
1. Prepare the DHIS2 metadata
Download the event metadata package. In DHIS2 Import/Export, validate and import the JSON file. Confirm that all four objects import successfully: two data elements, one event program, and one program stage.
| Object | Identifier | Configuration |
|---|---|---|
| iCapture Guide - Simple service encounter | g9tryfBuBFL |
Event program without registration; assigned to Adonkia CHP |
| iCapture Guide - Service encounter | aOoQULDnelY |
One stage; event date label is Service date |
| Service provided | ekF2UnBhmu6 |
TEXT; required in the stage |
| Number served | qV3p5xbeaXA |
INTEGER_ZERO_OR_POSITIVE; required in the stage |
| Adonkia CHP | Rp268JB6Ne4 |
Existing demo organisation unit |
Both data elements use DHIS2's tracker/event data domain (TRACKER). This describes their metadata domain; the program is an event program without tracked entity registration.
The package references the demo's existing organisation unit and default category combination. On another database, prepare equivalent metadata and update EVENT_PROGRAM_ID. The form discovers its data elements from the program stage.
If you create the metadata manually
- Create two data elements for the tracker/event domain with the value types above. Set their form names to Service provided and Number served.
- Create an event program without registration, containing one program stage.
- Add both data elements to that stage and mark them required. Set the event date label to Service date.
- Assign the program to Adonkia CHP.
- Use no program sections, custom categories, geometry, or option sets for this first example.
- Record the program identifier for the extension configuration.
Allow public data capture
Check Sharing for the program and program stage. Set public metadata access to Can view only and public data access to Can capture data. The metadata package includes these permissions. The data element definitions are publicly viewable.
Public sharing applies to signed-in users; the user still needs appropriate authorities, organisation unit assignments, and applicable category option access.
Checkpoint: reload iCapture, select the new program and Adonkia CHP, and confirm that the core event list and registration action are available.
2. Create the extension files
Add the following files inside src/extensions/:
src/extensions/
├── aggregate/
├── event/
│   ├── config.js
│   └── simple-event-form.jsx
└── useExtensions.jsx
Keep your existing aggregate files and registration.
src/extensions/event/config.js
Only the program identifier is configured locally. Field identifiers and labels come from core metadata.
export const EVENT_PROGRAM_ID = "g9tryfBuBFL";
3. Create the custom layout
src/extensions/event/simple-event-form.jsx
Use the existing core components to render labels, required markers, translated names, date input, and data element input types:
import RhfDhis2Input from "@/components/dhis2/rhfdhis2input";
import DataElementLabel from "@/features/event/dataelementlabel";
import EventDateLabel from "@/features/event/eventdatelabel";
import useSelectionStore from "@/store/selectionStore";

const SimpleEventForm = ({ status = {} }) => {
  const { program } = useSelectionStore();
  const programStage = program?.programStages?.[0];

  if (!programStage) return null;

  const dateStatus = status.occurredAt || {};

  return (
    <div className="p-4 space-y-4">
      <h2 className="text-lg font-semibold">Simple service encounter</h2>
      {!dateStatus.hidden && (
        <div>
          <EventDateLabel programStage={programStage} />
          <RhfDhis2Input
            dataItemId="occurredAt"
            dataItem={{ valueType: "DATE" }}
            disabled={dateStatus.disabled}
            helpers={dateStatus.helpers}
          />
        </div>
      )}
      {programStage.programStageDataElements.map(({ dataElement }) => {
        const fieldStatus = status[dataElement.id] || {};
        if (fieldStatus.hidden) return null;

        return (
          <div key={dataElement.id}>
            <DataElementLabel dataElement={dataElement.id} programStage={programStage.id} />
            <RhfDhis2Input
              dataItemId={dataElement.id}
              disabled={fieldStatus.disabled}
              helpers={fieldStatus.helpers}
            />
          </div>
        );
      })}
    </div>
  );
};

export default SimpleEventForm;
How the component works
| Reused item | Purpose in this form |
|---|---|
useSelectionStore() |
Supplies the currently selected program. |
program.programStages[0] |
Supplies the single stage used by this event program. |
programStage.programStageDataElements |
Determines the data fields to render. Each entry references a data element through dataElement.id. |
EventDateLabel |
Displays the stage's configured event date label and required marker. It receives the stage object. |
DataElementLabel |
Finds the field metadata and displays its translated form name and compulsory marker. It receives the data element and stage identifiers. |
RhfDhis2Input |
Chooses the input type from metadata and connects it to the existing form context. |
status |
Supplied by the core capture form; contains each field's hidden state, disabled state, and helper messages. |
occurredAt is the core event-date field. It is not a data element identifier, so its input receives dataItem={{ valueType: "DATE" }} explicitly. Data element inputs use their actual identifiers as dataItemId.
The component skips hidden fields and passes disabled states and helper messages to the inputs. That preserves the core's relevant rule effects and validation feedback for this simple program.
The outer p-4 space-y-4 adds padding and spacing; text-lg font-semibold styles the title. There are no custom stylesheets or responsive classes.
This example supports the single-stage program prepared above. Additional features such as sections, geometry, option filtering, age inputs, and special date constraints need the corresponding core props or components; they are outside this simple form.
4. Register the form for the program
src/extensions/useExtensions.jsx
Add the event registration alongside your existing aggregate registration. For the project used in this guide, the complete hook is:
import { useEffect } from "react";
import useExtensionStore from "@/store/extensionStore";
import MonthlyServiceTotals from "./aggregate/monthly-service-totals";
import { DATA_SET_ID } from "./aggregate/config";

import SimpleEventForm from "./event/simple-event-form";
import { EVENT_PROGRAM_ID } from "./event/config";

const useExtensions = () => {
  const setExtensions = useExtensionStore((state) => state.setExtensions);

  useEffect(() => {
    setExtensions(["aggregate", "forms", DATA_SET_ID], MonthlyServiceTotals);
    setExtensions(["event", "forms", EVENT_PROGRAM_ID], {
      Form: SimpleEventForm,
      validations: {},
      rules: []
    });
  }, [setExtensions]);
};

export default useExtensions;
The core reads extensions.event.forms[EVENT_PROGRAM_ID]. Its value is an object containing the form component, additional validations, and additional rules.
Formpoints to the custom component.validations: {}adds no extra validation. Core metadata validation still applies, including required fields and numeric value types.rules: []adds no extension rules. Existing DHIS2 program rules remain enabled by default.
No new form provider, API request, save button, or custom save handler is required. The core supplies those parts of the event workflow.
Checkpoint: reload iCapture, select the program and organisation unit, and select Register event. Confirm that Simple service encounter appears with Service date and the two data fields.
5. Enter and save an event
- Select Adonkia CHP and select Register event.
- Enter a valid Service date, such as today.
- Enter
Consultationfor Service provided. - Enter
3for Number served. - Select the core Save action and confirm successful feedback.
- Close the form, reopen that event from the list, and confirm the date and both values were restored.
- Change Number served to
4, select Save, and reopen the same event. Confirm the value changed without creating a duplicate event.
The Complete action is a separate core action that saves and marks the event completed. Keep the event active while following the edit steps in this guide.
6. Check required fields and validation
- Leave a required field empty and check that the core displays an error and blocks saving.
- Enter a negative or fractional Number served value and check the validation feedback.
- Enter
0and confirm it can be saved. - Reopen the same event after editing and confirm values are associated with that event and organisation unit.
A message alone is not the full persistence check: reopen the event and inspect the stored values.
Example files
Completion checklist
- [ ] The custom form appears for the intended event program.
- [ ] The fields are read from the selected program stage.
- [ ] Core labels and required markers are displayed.
- [ ] Hidden, disabled, and validation states are preserved.
- [ ] Save creates one event and reopening restores its values.
- [ ] Editing updates that same event.
- [ ] The existing aggregate extension still works.
- [ ] Application code changes are limited to
src/extensions/.
Continue with Testing and Troubleshooting before submitting your project change.