Create a Simple Aggregate Form
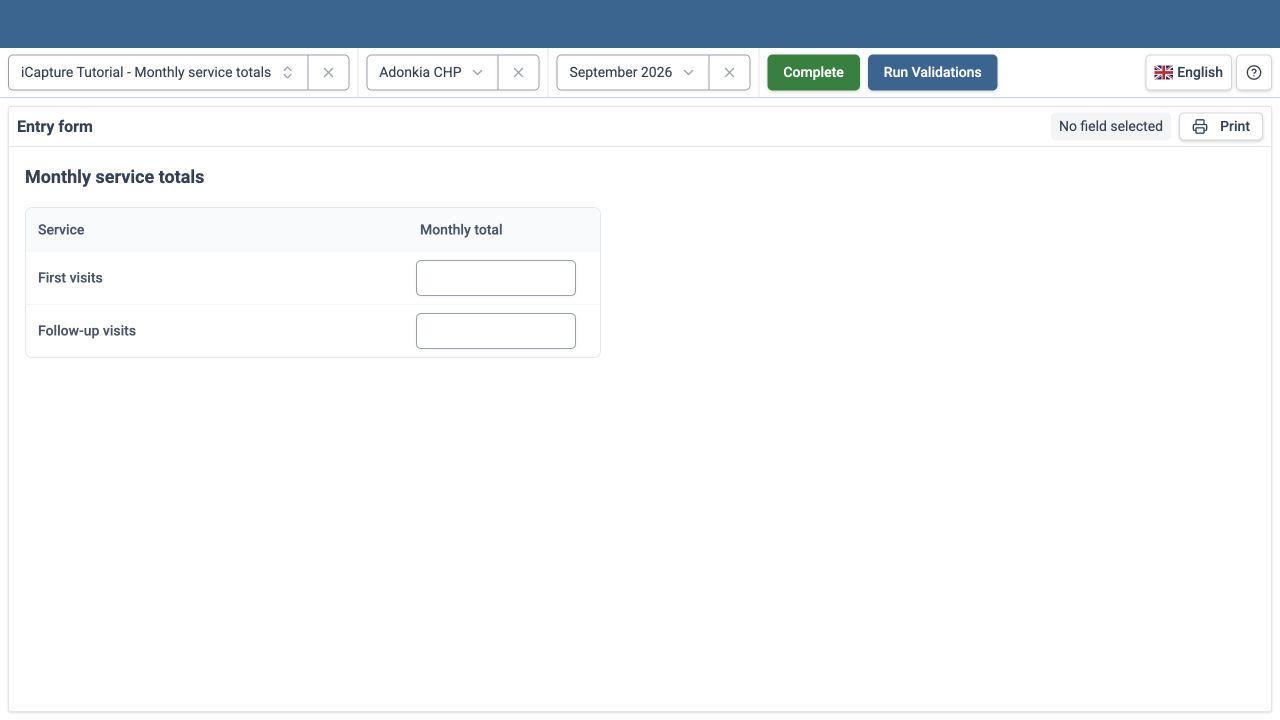
Create a monthly service totals form inside src/extensions/ in your project fork. The form gets its rows from the selected dataset, reuses metadata already loaded by iCapture, and uses the shared aggregate input for automatic saving. The sample dataset contains two fields.
What you will make for this guide
- Dataset: iCapture Tutorial - Monthly service totals.
- Organisation unit: Adonkia CHP.
- Fields: First visits and Follow-up visits.
- Period type: Monthly.
- Categories: default for both the dataset and data elements.
This first example customises the field layout. Each numeric value saves when you leave its field; there is no separate Save button in the custom form. The dataset's Complete action records completion and is separate from saving individual values.
Before you start
Complete Fork the Core Repository, Start Locally, and Extension Basics.
This guide uses the official Sierra Leone demo running DHIS2 in dhis2.org.
Open the DHIS2 demo instance selection page and choose an available stable instance with the Sierra Leone demo database.
The public demo login is admin / district. Use fictional tutorial values. The login page states that the instance resets every night, so retain the metadata file to restore the guide after a reset.
1. Prepare the DHIS2 metadata
Import the tutorial package
Download aggregate tutorial metadata. In the DHIS2 Import/Export app, open metadata import, select the JSON file, validate it, and import it. Confirm there are no failed objects.
The package creates two data elements and one dataset. It references the demo's existing default category combination and Adonkia CHP organisation unit. It does not include or replace those shared objects.
| Object | Identifier | Configuration |
|---|---|---|
| Dataset | FDY2uBmaoLq |
Monthly; default category combination; assigned to Adonkia CHP |
| First visits | OpBsCYrBapb |
Aggregate; INTEGER_ZERO_OR_POSITIVE; aggregation SUM; zero is significant |
| Follow-up visits | NDN8QXEEFZ1 |
Aggregate; INTEGER_ZERO_OR_POSITIVE; aggregation SUM; zero is significant |
| Default category combination | bjDvmb4bfuf |
Existing demo metadata |
| Default category option combination | HllvX50cXC0 |
Existing demo metadata |
| Adonkia CHP | Rp268JB6Ne4 |
Existing demo organisation unit |
Other DHIS2 instances
On another instance, prepare equivalent metadata and update DATA_SET_ID in the form configuration. Data element identifiers and labels are read from the selected dataset and loaded metadata. Its default category combination and organisation unit identifiers may differ. This package depends on the Sierra Leone demo metadata.
If you create the metadata manually
Use the DHIS2 metadata maintenance tools to create two aggregate data elements with the settings above, then create a Monthly dataset containing them. Assign the dataset to Adonkia CHP, keep default categories, and leave expiry disabled for the tutorial. Record the generated dataset identifier and use it as DATA_SET_ID in step 3. The component discovers its data elements from the selected dataset.
Allow public data entry
After importing or creating the dataset, check its sharing settings:
- Open the dataset in the DHIS2 metadata maintenance app.
- Open Sharing for iCapture Tutorial - Monthly service totals.
- Under Public access, set metadata access to Can view only (or keep a broader existing metadata permission).
- Set data access to Can capture data. Public metadata access alone does not allow data entry.
- Save or close the dialog as required by the app, reopen Sharing, and confirm the data access setting remains Can capture data.
The downloadable metadata package explicitly sets public metadata viewing and data capture:
"sharing": {
  "public": "r-rw----"
}
Public sharing here applies to users signed in to DHIS2. Users also need the required data entry permissions, organisation unit assignment, and access to the applicable category options. This example uses the demo's existing default category options; do not change shared demo objects for this guide.
Checkpoint: confirm the dataset contains both data elements, is assigned to Adonkia CHP, and permits public data capture. Reload iCapture so newly imported metadata is loaded.
2. Connect your local application
For this demo, the local .env is:
VITE_BASE_URL="https://play.im.dhis2.org/YOUR_SELECTED_INSTANCE"
VITE_USERNAME="admin"
VITE_PASSWORD="district"
VITE_DEBUG="false"
Replace YOUR_SELECTED_INSTANCE with the instance path you selected on the demo page. Use its base URL only, without /dhis-web-login/, /apps/, or another application path. The instance selection page is for choosing a demo; it is not the API base URL.
Keep .env out of Git. These are public demo credentials for local development. Start the application with the commands from Start Locally, normally yarn install followed by yarn start. Restart the development server after changing .env.
Checkpoint: open the tutorial dataset, select Adonkia CHP and a reporting month, and confirm the standard form loads before adding the extension.
3. Create the extension files
Create the aggregate folder and two files, and edit the existing extension hook:
src/extensions/
├── aggregate/
│   ├── config.js
│   └── monthly-service-totals.jsx
├── extensionConfig.js
├── useCustomInit.js
└── useExtensions.jsx
The aggregate folder and filenames are conventions for this example. The core selects the form using the registration entry in step 5.
src/extensions/aggregate/config.js
Keep the target dataset identifier in this file. The component reads data element identifiers and labels from the core stores, so there is no separate field list to maintain.
export const DATA_SET_ID = "FDY2uBmaoLq";
4. Create the custom layout
src/extensions/aggregate/monthly-service-totals.jsx
The custom layout displays a table with Service and Monthly total columns. It creates one row for every data element assigned to the selected dataset. Each row uses RhfAggregateDhis2Input, which connects to the core's existing form context and automatically saves numeric values when you leave the field.
import RhfAggregateDhis2Input from "@/components/dhis2/rhfaggregatedhis2input";
import useMetadataStore from "@/store/metadataStore";
import useSelectionStore from "@/store/selectionStore";

const MonthlyServiceTotals = () => {
  const { categoryOptionCombos, dataElements } = useMetadataStore();
  const { dataSet } = useSelectionStore();
  const defaultCombo = categoryOptionCombos.find((combo) => combo.categoryCombo?.isDefault);

  return (
    <div className="p-4">
      <h1 className="mb-4 text-lg font-semibold text-slate-700">Monthly service totals</h1>
      <div className="max-w-xl overflow-hidden rounded-lg border border-slate-200">
        <table className="w-full text-sm">
          <thead className="bg-slate-50 text-slate-600">
            <tr>
              <th className="p-3 text-left font-medium">Service</th>
              <th className="w-48 p-3 text-left font-medium">Monthly total</th>
            </tr>
          </thead>
          <tbody className="divide-y divide-slate-100">
            {dataSet.dataSetElements.map((field) => {
              const foundDataElement = dataElements.find((de) => de.id === field.dataElement.id);
              return (
                <tr key={foundDataElement.id}>
                  <td className="p-3 font-medium text-slate-600">{foundDataElement.formName}</td>
                  <td className="p-2">
                    <RhfAggregateDhis2Input
                      className="w-40"
                      dataElementId={foundDataElement.id}
                      name={`${foundDataElement.id}-${defaultCombo.id}-${defaultCombo.id}`}
                    />
                  </td>
                </tr>
              );
            })}
          </tbody>
        </table>
      </div>
    </div>
  );
};

export default MonthlyServiceTotals;
Keep the table compact
The styling uses a few Tailwind utilities without screen-size variants:
| Class | Purpose |
|---|---|
max-w-xl |
Limits the table container to 576px with the default Tailwind scale. |
w-48 |
Gives the Monthly total column a compact width. |
w-40 |
Keeps the shared input at 160px with the default Tailwind scale. |
bg-slate-50 |
Adds the pale header background. |
border-slate-200, divide-slate-100 |
Add a subtle outer border and row separators. |
text-slate-600, text-slate-700 |
Set the label and title colors. |
These classes affect appearance only. The core input continues to handle field values and saving.
How the component gets its rows
useSelectionStore()providesdataSet, the dataset selected in iCapture.dataSet.dataSetElementslists the data elements assigned to that dataset. The component maps this list to table rows.field.dataElement.ididentifies the data element for the current row.useMetadataStore()providesdataElements, the data element metadata already loaded by the core.dataElements.find(...)retrieves the matching metadata object asfoundDataElement.foundDataElement.formNamesupplies the displayed label, whilefoundDataElement.idconnects the shared input to the correct data element.
const { dataSet } = useSelectionStore();
const { dataElements } = useMetadataStore();

// Inside dataSet.dataSetElements.map((field) => { ... })
const foundDataElement = dataElements.find(
  (de) => de.id === field.dataElement.id
);
The dataset's assigned elements determine the rows; no data element identifiers or labels are repeated in a local field list. After changing dataset metadata in DHIS2, reload iCapture to load the updated metadata.
This simple component expects the selected dataset, its referenced data elements, their form names, and the default category option combination to be available. The sample metadata supplies these values. It uses the dataset element list as returned by the core and does not add a separate sorting rule. Data elements with custom category combinations need a layout that handles those combinations.
For short explanations and more reusable examples, see Core Reference.
How the fields connect to stored values
| Property | Purpose |
|---|---|
dataElementId |
Selects the data element metadata and its input type. |
name |
Matches the field key used by the aggregate core to load existing values. |
This component passes only dataElementId and name to the shared input. It does not pass control or dataset category options; the input uses the existing form context and this dataset uses default categories.
The aggregate field key contains three identifiers:
DATA_ELEMENT_UID-CATEGORY_OPTION_COMBO_UID-ATTRIBUTE_OPTION_COMBO_UID
For First visits in this example:
OpBsCYrBapb-HllvX50cXC0-HllvX50cXC0
The component finds defaultCombo in the loaded categoryOptionCombos using combo.categoryCombo?.isDefault. The final two identifiers in the field name are the same because both the data element and dataset use default categories. Resolve the default combination from loaded metadata, as the component does. A dataset with custom categories needs its selected attribute option combination and category options instead; this simple example is designed for default categories only.
RhfAggregateDhis2Input handles loading-compatible field binding, saving on blur for numeric inputs, and completion, expiry, and approval states. The layout does not call the data API directly or add a second save workflow.
5. Register the form for the dataset
src/extensions/useExtensions.jsx
For a fresh core checkout, replace the empty hook with:
import { useEffect } from "react";
import useExtensionStore from "@/store/extensionStore";
import MonthlyServiceTotals from "./aggregate/monthly-service-totals";
import { DATA_SET_ID } from "./aggregate/config";

const useExtensions = () => {
  const setExtensions = useExtensionStore((state) => state.setExtensions);

  useEffect(() => {
    setExtensions(["aggregate", "forms", DATA_SET_ID], MonthlyServiceTotals);
  }, [setExtensions]);
};

export default useExtensions;
The registration stores the component at extensions.aggregate.forms[DATA_SET_ID]. The aggregate core checks the selected dataset identifier and renders the matching component.
Use useEffect to update the store after rendering. Register only this dataset entry so other forms remain available. If your project already has extension hooks, add this registration to the existing implementation.
Checkpoint: reload iCapture and open the tutorial dataset. You should see Monthly service totals above a table with Service and Monthly total columns, and rows for First visits and Follow-up visits.
6. Enter values and reopen the form
- Select Adonkia CHP and a completed reporting month.
- Enter
12for First visits, then move to the next field to trigger saving. - Enter
7for Follow-up visits, then click outside the input to trigger saving. - Wait for the save feedback before navigating away.
- Reload and select the same dataset, organisation unit, and month. Confirm the values are
12and7. - Change First visits to
15, leave the field, and reopen. Confirm15and7. - Select another month and confirm that the previous month's values do not carry over. Return to the original month and confirm they are restored.
- Check that every data element assigned to the sample dataset appears as a row. If you add another compatible data element in DHIS2, reload iCapture and confirm the row appears without editing the component.
The saved record is identified by the data element, category option combination, attribute option combination, organisation unit, and period. Labels and layout do not identify stored data.
7. Check validation and empty values
- Enter
0, leave the field, and verify it is stored and restored as zero. - Try an invalid negative or fractional value. Confirm the server rejects it for these non-negative integer data elements and inspect the error feedback.
- Clear one saved field, leave it, and reopen. Confirm it is empty while the other value remains.
- Confirm a failed request does not lead you to treat the value as saved; reopen and check the persisted value.
The shared input provides the core's current error and save behaviour. This tutorial does not add a new validation engine.
Example files
Completion checklist
- [ ] The dataset permits public data capture.
- [ ] The custom layout opens only for the tutorial dataset.
- [ ] Rows and labels come from the selected dataset and loaded data element metadata.
- [ ] Both numeric fields save after leaving the input.
- [ ] Reopening restores the saved values.
- [ ] Editing updates the same reporting context.
- [ ] Zero and clearing a field behave as expected.
- [ ] Switching month shows the correct values.
- [ ] Invalid values and save failures are recognised.
Continue with Testing and Troubleshooting before submitting your project change.